This article describes how to avoid hardcoding the IP/DNS addresses of the jumpbox in the SSH config file. And, is useful when you have multiple jumpboxes in different regions and you want to access them using the same SSH config file.
Some familiarity with Unix/Linux command line tools, AWS Cloud(incl. aws-cli) is assumed as a basic skill and is seldom discussed.
Some of the benefits of using ProxyCommand based ssh config are:
- No need to update the SSH config file when the jumpbox IP/DNS changes
- No need to update the SSH config file when you add a new region or environment
- No need to update the SSH config file when you add a new resource in a subnet
Background Context
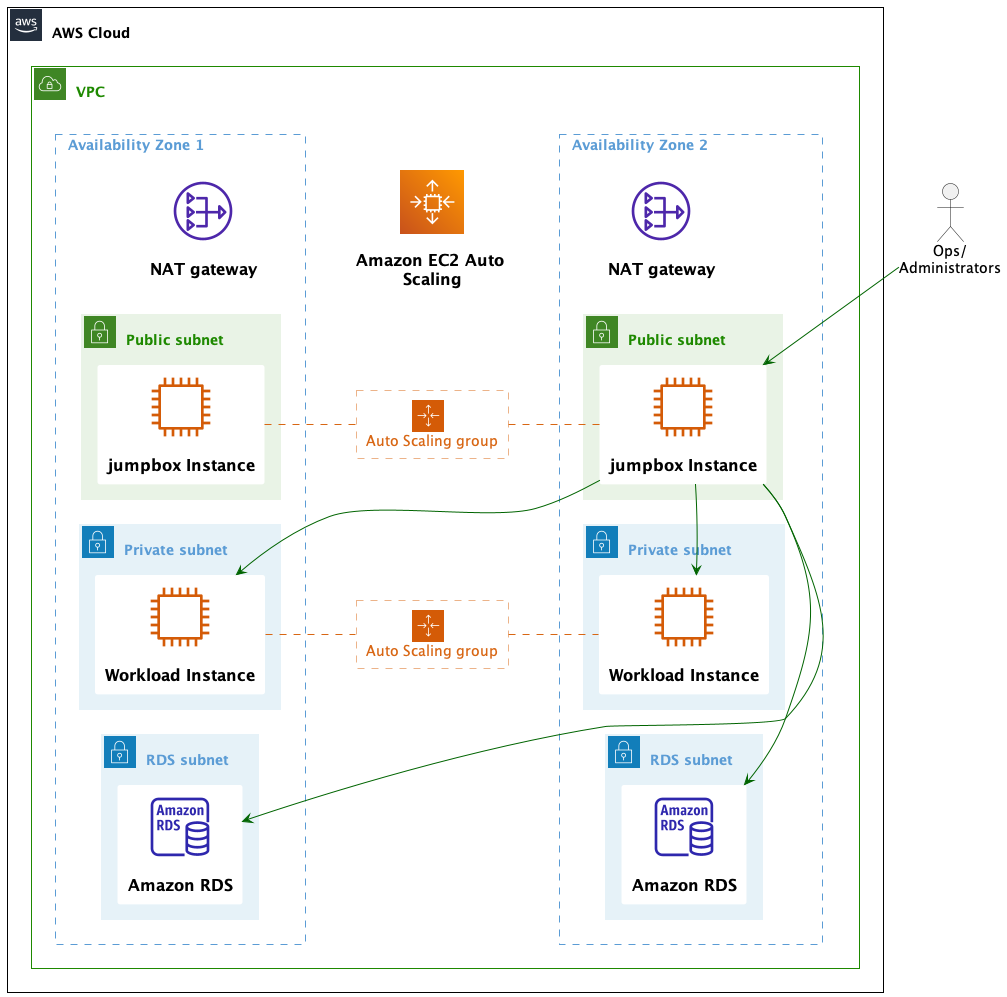
The fundamental problem is to access resources in private subnets of a VPC. Like any other AWS resource, the EC2 instances in private subnets are not accessible from the internet. To access them, we need to use a jumpbox. The jumpbox is an EC2 instance in a public subnet of the same VPC. The jumpbox is the only instance accessible from the internet and has access to the resources in private subnets. The setup is in the following diagram:
Normally, we would hardcode the IP/DNS address of the jumpbox in the SSH config file and then use it to jump to the private resources. This is not a good practice as the IP/DNS address of the jumpbox is likely to change. And, we would have to update the config file every time the IP/DNS address changes. Also, we would have to update the SSH config file when we add a new region or environment or a subnet, or a VPC. This is error-prone and tedious.
This is where ProxyCommand-based dynamic ssh config comes to the rescue. Not only it avoids hardcoding of the jumpbox address, but it also avoids manual maintenance of the SSH config file.
What is SSH ProxyCommand?
ProxyCommand is a specific command used to connect to a remote server. This allows you to specify a command to run when the SSH client is invoked. The specified command then determines and connects the users to the actual host. This is useful when you have multiple jumpboxes in different regions and you want to access them using the same SSH config file.
If that is hard, think of a function that takes an AWS Region and an EC2 Instance Identifier as input and returns the DNS address of the EC2 Instance. Think of another function that takes the result from the previous one and returns an SSH connection to the EC2 Instance. This is what Dynamic SSH does.
In this article, we will implement Dynamic SSH by doing the following:
- Fetch the DNS address of the jumpbox EC2 Instance at runtime
- Use the DNS address to connect to the jumpbox instance itself
- Then, use that connection to jump to the private instances
Let’s talk about these steps in detail.
Fetching the address
Since we are using AWS, we can use the aws-cli to fetch the DNS address of any EC2 instance. The following command will fetch the DNS address of the jumpbox in the us-east-1 region:
aws ec2 describe-instances --region us-east-1 --filters "Name=tag:Name,Values=jumpbox" --query "Reservations[*].Instances[*].PublicDnsName" --output textAs you can see, the script above does not take any input. It is hard coded to fetch the DNS address of the jumpbox in the us-east-1 region. We need to pass the region as input to make it dynamic. We can do that by using the REGION environment variable.
aws ec2 describe-instances --region $REGION --filters "Name=tag:Name,Values=jumpbox" --query "Reservations[*].Instances[*].PublicDnsName" --output textSimilarly, we can pass the jumpbox identifier as an input. We can do that by using the JUMPBOX_IDENTIFIER environment variable.
aws ec2 describe-instances --filters Name=tag:Name,Values="$JUMPBOX_IDENTIFIER" --region $REGION --query 'Reservations[*].Instances[*].[PublicDnsName]' --output textFinally, this script is not specific to a particular AWS region or environment. It can access any jumpbox in any AWS region or development environment. We must set the JUMPBOX_IDENTIFIER and REGION environment variables accordingly. Also, it can extend to support different cloud providers like Azure, GCP, etc.
Very important to note that the script assumes that the jumpbox is tagged with the following tags:
Name- the jumpbox identifier
SSH to jumpbox
The following configuration is a wrapper around the previous script. It takes the region and jumpbox identifier as input and returns the SSH connection to the jumpbox. Then, this connection is used to jump to private resources.
Host jumpbox
	StrictHostKeyChecking no
	User ec2-user
	CheckHostIP/DNS no
	ProxyCommand bash -c "ssh ec2-user@$(aws ec2 describe-instances --filters Name=tag:Name,Values="$JUMPBOX_IDENTIFIER" --region $REGION --query 'Reservations[*].Instances[*].[PublicDnsName]' --output text) -W $(aws ec2 describe-instances --filters Name=tag:Name,Values="$JUMPBOX_IDENTIFIER" --region $REGION --query 'Reservations[*].Instances[*].[PublicDnsName]' --output text):22"
	UserKnownHostsFile /dev/null

Host *.compute.amazonaws.com
	StrictHostKeyChecking no
	AddKeysToAgent yes
	UseKeychain yes
	User ec2-user
	ForwardAgent yes
	IdentityFile ~/.ssh/ssh
	UserKnownHostsFile /dev/null
The ssh config file listed above has the following sections:
Host jumpbox- the wrapper around the aws-cli script. It takes theREGIONandJUMPBOX_IDENTIFIERas input and starts a new SSH command to connect to the jumpbox.Host *.compute.amazonaws.com- this is the default section for the jumpbox. The ssh command executed in the previous step uses this configuration to connect to the jumpbox.
So, in short, the jumpbox section of the SSH config file is the wrapper around the aws-cli script. It takes the region and jumpbox identifier as input and starts a new SSH command to connect to the jumpbox. And the default section of the SSH config file is the wrapper around the ssh command executed by the jumpbox section. It takes the DNS address of the jumpbox as input and returns the actual SSH connection to the jumpbox. After setting the JUMPBOX_IDENTIFIER and REGION environment variables, we can use the following command to connect to the jumpbox:
Sample Command
JUMPBOX_IDENTIFIER=jumpbox-1 REGION=us-east-1 ssh jumpboxSample output
~ >>>JUMPBOX_IDENTIFIER=jumpbox REGION=us-east-1 ssh jumpbox
Warning: Permanently added 'ec2-16-71-2-98.us-east-1.compute.amazonaws.com' (ED25519) to the list of known hosts.
Warning: Permanently added 'jumpbox' (ED25519) to the list of known hosts.

       __|  __|_  )
       _|  (     /   Amazon Linux 2 AMI
      ___|\___|___|
[ec2-user@ip-10-0-0-1 ~]
Viola !!! We have successfully connected to the jumpbox. Now we can enhance this setup to configure a ProxyJump to access the private resources.
SSH to private resources
The following is the Host *.compute.internal section of the SSH config file, the wrapper that executes the jumpbox section and is responsible for jumping to private resources.
Host *.compute.internal
	ProxyJump jumpbox
	CheckHostIP no
	StrictHostKeyChecking no
	AddKeysToAgent yes
	UseKeychain yes
	User ec2-user
	ForwardAgent yes
	IdentityFile ~/.ssh/ssh
	UserKnownHostsFile /dev/null
It works because the ProxyJump jumpbox section returns the SSH connection to the jumpbox. And, the Host *.compute.internal section uses this connection to jump to the private resources. Hence, we can access the private resources using the following command:
Sample Command
ssh private-ip.compute.internalSample output
~ >>>JUMPBOX_IDENTIFIER=jumpbox-1 REGION=us-east-1 ssh ip-10-0-0-2.compute.internal
Warning: Permanently added 'ec2-16-71-2-98.us-east-1.compute.amazonaws.com' (ED25519) to the list of known hosts.
Warning: Permanently added 'jumpbox' (ED25519) to the list of known hosts.
Warning: Permanently added 'ip-10-0-0-2.us-east-1.compute.internal' (ED25519) to the list of known hosts.

       __|  __|_  )
       _|  (     /   Amazon Linux 2 AMI
      ___|\___|___|

https://aws.amazon.com/amazon-linux-2/
[ec2-user@ip-10-0-0-2 ~]$
Accessing PostgreSQL
This setup can also be used to access PostgreSQL. We can use the following command to connect to the PostgreSQL database:
Sample Command
pgcli -h postgres.us-east-1.rds.amazonaws.com --password -d postgres --user postgres --ssh-tunnel jumpboxsshtunnel2
Sample output
~ >>>JUMPBOX_IDENTIFIER=jumpbox-1 REGION=us-east-1 pgcli --ssh-tunnel jumpbox -h my-postgres.us-east-1.rds.amazonaws.com --password -d postgres --user postgres
Password for postgres: *******************************
Server: PostgreSQL 13.4
Version: 3.4.1
Home: http://pgcli.com
postgres@127:postgres> select * from information_schema.columns
The result was limited to 1000 rows
Time: 2.499s (2 seconds), executed in: 1.953s (1 second)
postgres@127:postgres> quit
Goodbye!
Conclusion
Hence we have dynamically accessed the private resources using the ProxyJump and ProxyConnect features of the SSH. This setup is clean, easy, and straightforward to maintain and extend to support multiple cloud providers or environments.
Pgcli is a command line interface for Postgres with auto-completion and syntax highlighting. It can be installed using the following command:
pip install pgcli. ↩︎sshtunnel is a Python library that allows you to create SSH tunnels from your local machine to a remote server. It can be installed using the following command:
pip install sshtunnel. ↩︎